
Apache NiFi (see Introduction to NiFi) is a free open-source tool for managing the flow of data between systems.
In this second post, we build a working NiFi demo, with a couple of simplified use cases, allowing us to see it in action and learn by experimenting. The demo runs in a Docker container and comes with batch and real time event DataFlows and basic test data.
See Step 1 of Build an ELK Stack for notes on building a suitable host for running Docker containers on. Note: this demo is a minimal installation with no security and is not suitable for production use.
Clone the Demo and Start NiFi
Clone the repo (includes docker-compose file and sample DataFlows & data)
cd
git clone https://github.com/mattjhayes/nifi-example.git
Now go into the cloned repo and start the container:
cd nifi-example
!
! Note, may require sudo:
docker compose up
The NiFi container may take a while to start the first time. Here is what we are standing up, including the sample data for our demos:

Connect to the NiFi web UI on the host machine. If you’re using a browser directly on the same host then the URL will be http://localhost:8091/nifi/, otherwise substitute in the IP address for localhost.
Demo 1 – Load CSV file and Convert to JSON
In the first demo we read in a comma-separated values (CSV) file of inventory items for a fictional retail chain and transform it into a JSON output file.
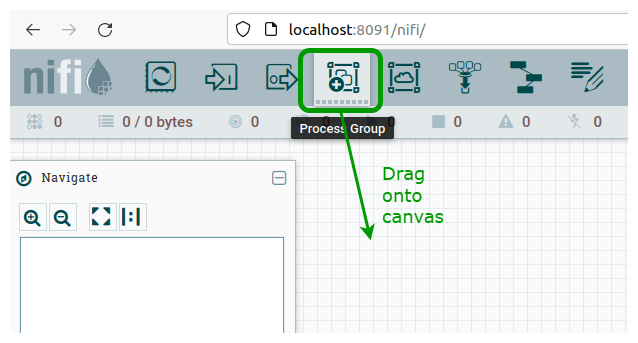
On the NiFi canvas, from the top menu bar, hold left-click and drag “Process Group” onto the canvas:
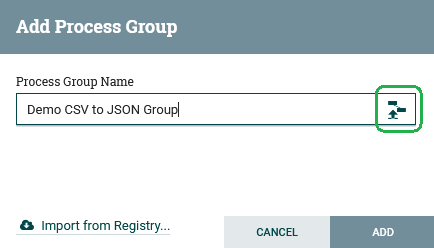
This brings up the “Add Process Group” window. Name it “Demo CSV to JSON Group”, then before you do anything else (!!!) click the File Upload icon on the right:
Browse to the sample_dataflows directory in the repo we cloned and chose the file csv_to_json_demo_dataflow.json. If you’re doing this remotely, then you may need to separately download the file from GitHub to your local machine and upload from there.
The screen should now look like this:

Click “ADD” and the new process group should appear on the canvas. Double click it and you should see this DataFlow, although the status on some of the Processors will differ (we fix that next):

Next, we need to enable the controller that operates behind-the-scenes to parse the CSV and turn it into JSON.
Right-click the “Convert CSV to JSON” processor (in the middle) and select “Configure”. Go into “PROPERTIES” tab and click the CSVReader arrow:

This takes you to a screen with a tab for “CONTROLLER SERVICES”.
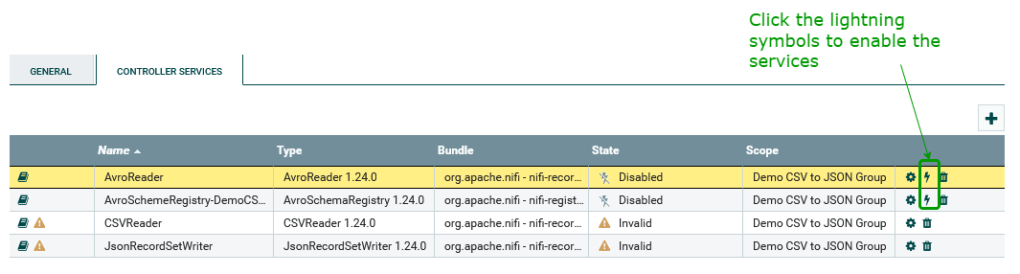
Click the lightning symbols on the right to enable the AvroReader and AvroSchemeRegistry-DemoCSVtoJSONGroup services:
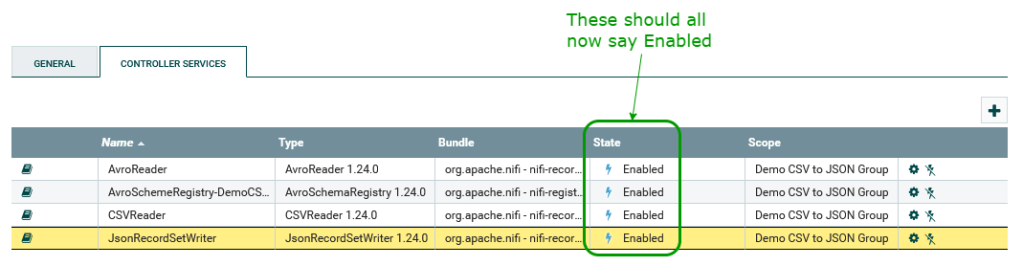
The bottom two rows will also get option to enable once the Registry is enabled. Enable them too and it should look like this:
We use these Controller Services behind the scenes in our DataFlow to do record reading and writing, something like this:

Controller Services are configured separately from the DataFlow, allowing them to be reused across multiple processors. We abstract the schema name into an attribute to support reusability.
The record processor called “Convert CSV to JSON” is configured to use a Record Reader and Record Writer in Controller Services. These each have some config (not all shown in diagram above) that links them to a common schema registry, and an attribute links to a particular schema written in Apache Avro format[i].
Optionally, you can go into the cog on each of these to look at the settings if you want to see how they are configured.
Close out of that screen.
Right click and “Start” the following processors:
- Set Schema Metadata
- Convert CSV to JSON
- Set JSON Filename
Right click the top processor “Get CSV File” and select “Run Once”:

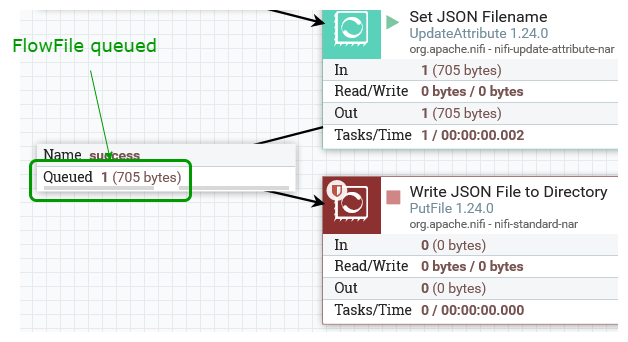
This causes the Processor to read in the CSV file supplied in the repo and turn it into a FlowFile that cascades through the other processors until it gets to the “Write JSON File to Directory” Processor, which we haven’t started yet.
Right-click on the canvas and select “Refresh” and you should see a FlowFile queued in the Connector to the “Write JSON File to Directory” Processor:
Right-click the Connector and choose “List queue”. Click the info symbol on the left:

This brings up a new browser tab that shows details and attributes for the flow file:
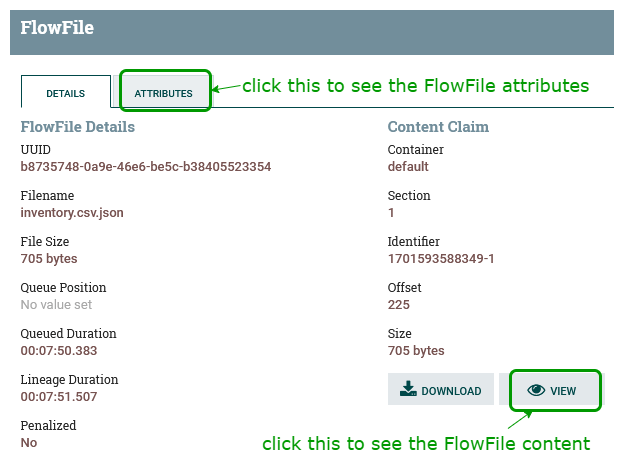
Click on “VIEW”, as above, and we can now see the transformed flow file that has been converted to JSON:

Note that our row of bad data from the sample CSV has been converted to JSON, with null for the other key-values, as per the schema. You can change this behaviour as desired.
Close the tab and FlowFile view to get back to the canvas and start the “Write JSON File to Directory” Processor.
Right-click on canvas and refresh and the queue is now empty as the FlowFile has been taken in and written out as a file.
You can check this file on the host machine:
$ cat sample_data/output_data/inventory.csv.jsonThe result JSON file in this demo was written out to a local file, however there are other Processors that could instead send it to other locations/systems. This has been a very basic use case, and there is a lot of scope to take it further.
Demo 2 – Event Processing
In this second demo, we are receiving events from different systems in our business and want to route these by source system and escalate any errors.
As with the previous demo, we start by adding a Process Group to the root-level canvas. Click “NiFi Flow in bottom-left to get back to the root view.
This time we import the file:
~/nifi-example/sample_dataflows/Demo_Ingest_HTTP_Events.jsonCall the new Process Group “Demo Ingest HTTP Events”.
Double-click into the new Process Group and you should see the DataFlow that looks like this:
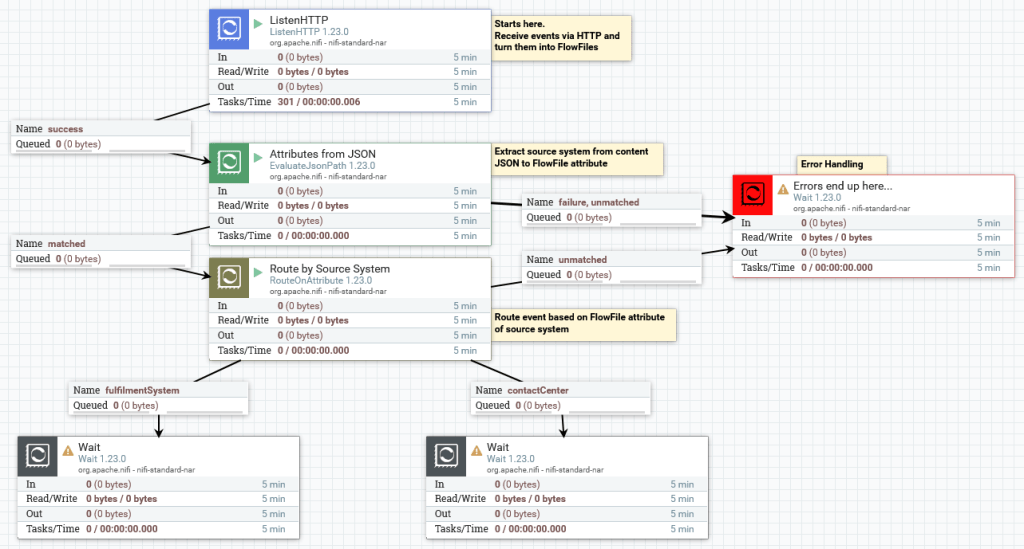
Note the use of Wait Processors to terminate flows in the demo. This is just to keep things simple, and in a real example there would be actions taken on the FlowFiles, such as calling other systems.
Start these Processors:
- ListenHTTP
- Attributes from JSON
- Route by Source System
The repo comes with five sample JSON event files in the following directory:
~/nifi-example/sample_data/events/Here is the first, event as an example of the format:
{
    "source_system": "contactCenter",
    "message_type": "customerQuery",
    "message_content": {
        "customer_query": "Hello, is there anybody out there?",
        "session_ID" : "A123456"
    }
}
Now, let’s send the events into NiFi using a small supplied Python script that sends events with HTTP POST:
$ cd ~/nifi-example/
$ python3 post_data.py
This should result in five output messages from the script like:
result for sample_data/events/01-message.json was 200Refresh the canvas in NiFi and we should see FlowFiles queued in the following places:
- In fulfilmentSystem queue, we should see 2 FlowFiles queued:
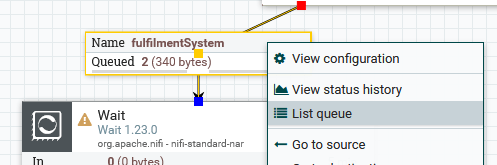
We can do “List Queue” and see they are events describing orders in the fulfilment system.
Similarly, in the contactCenter connector, we see two events:
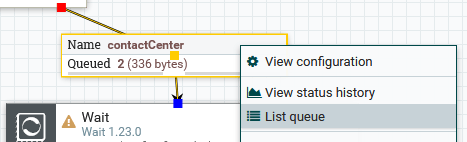
Over in our error handling area, we see a single event:
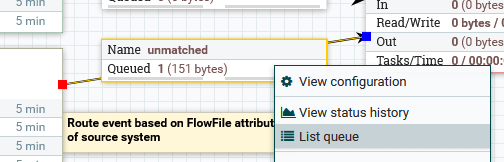
We can list queue and “view content” on it to see it is a pseudo-Java error that did not route properly. Always consider how to best handle errors in your flow design because they will happen!
This demo showed that we can use NiFi to ingest real-time events and take actions on them based on their content. This could be useful for visibility and security use cases, where event routing/filtering/enrichment would add value.
Wrapping it Up
In this post we built an experimental Apache NiFi installation to learn about some of the basic features. Hopefully you found this post useful.
[i] Apache Avro: https://avro.apache.org/docs/

That was an excellent walkthrough, Matt. Thank you for sharing. I highly appreciated it. Thank you
LikeLiked by 1 person